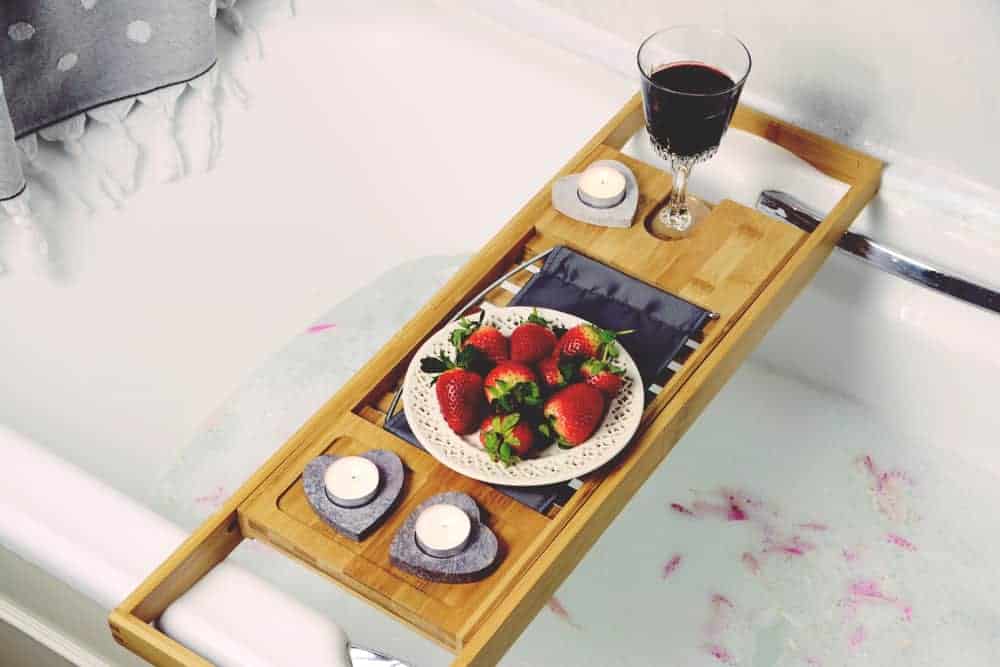
You know how some people get upset when you use the top of the fridge as a storage space? Or the window sill in the kitchen or bathroom? (Maybe you’re even one of those people …!) Well, for the bathroom at least, a waterproof shower caddy can stylishly resolve that pet peeve. It offers one neat spot for all your soaps, shampoos, beauty items, and bath products.
Plus you can make one out of practically anything. It’s a project that could take two minutes or two days, depending on how complex the concept is. But a DIY bath caddy is slightly different. Think of it like a breakfast-in-bed serving tray, but for the bathtub. And despite bathroom humidity, they’re often made of wood. Let’s learn 31 ways to construct a caddy.
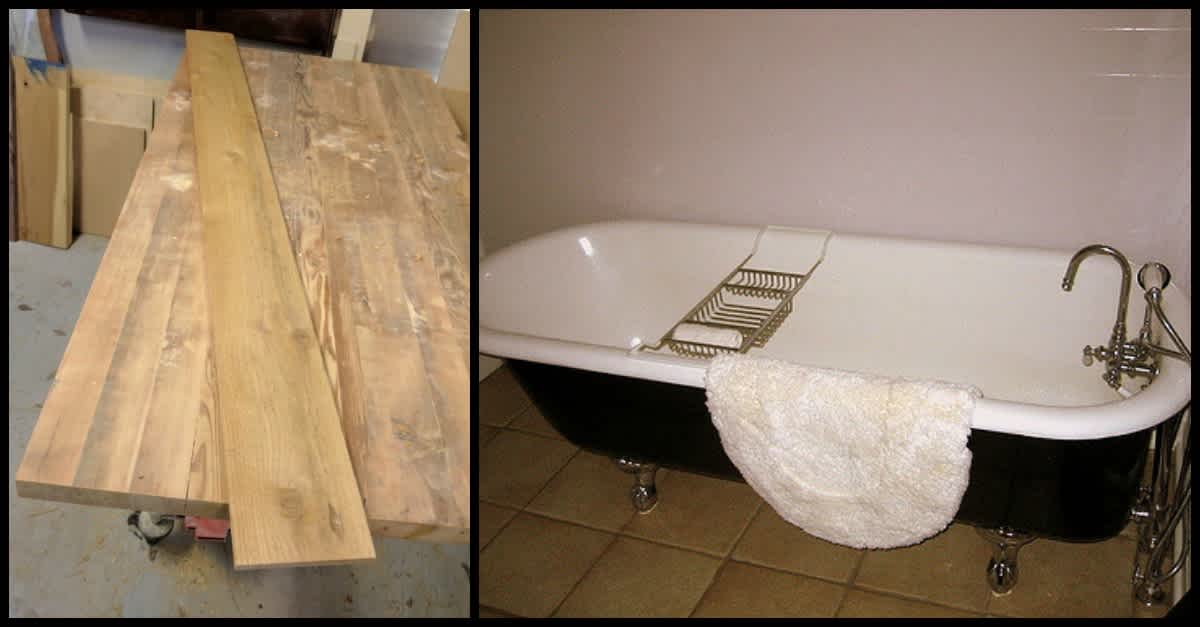
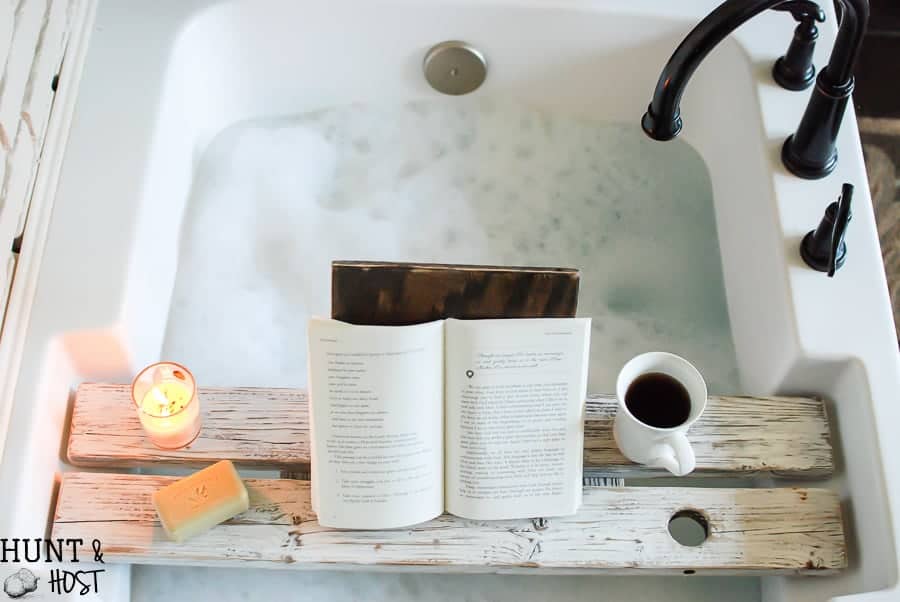
1. Crafted by the Hunts DIY Bath Tray
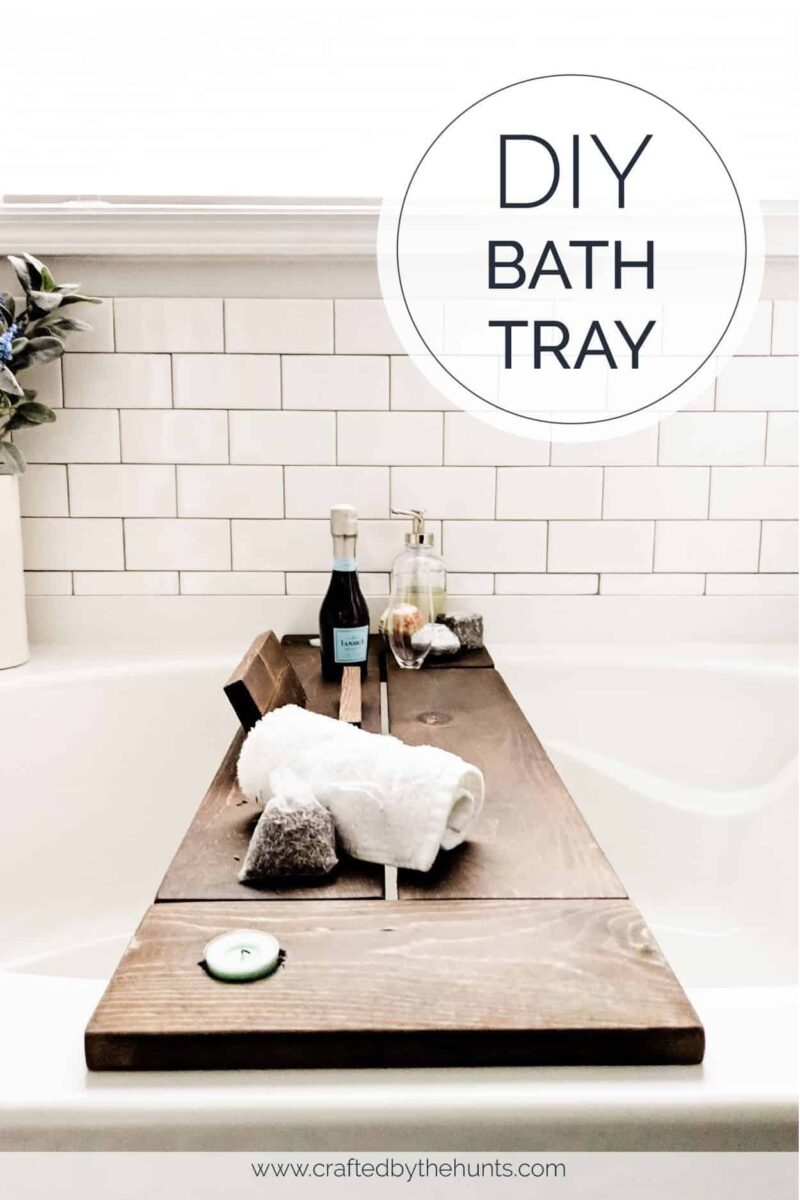
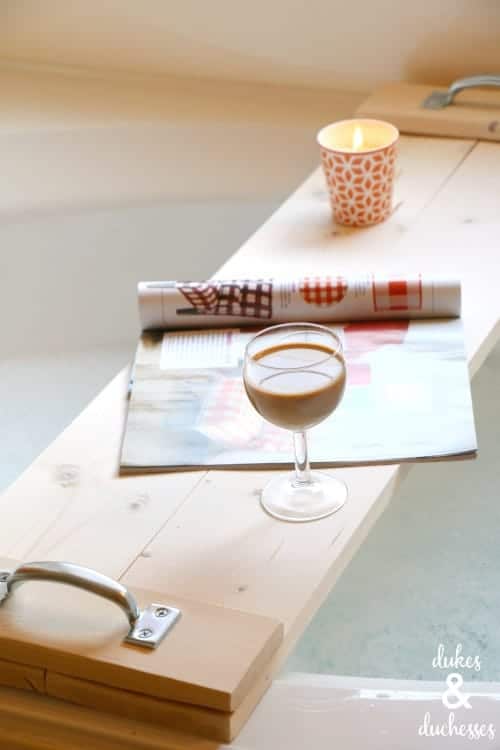
Our first idea for a DIY bath caddy comes from the Hunt Family, and it’s a book lover’s dream. The caddy has a pedestal where you can place your book (or your waterproof tablet). It also has a slot for candles and a small countertop. Rather than leaving a cup-holder hole, the caddy has a sanded slit just the right size for a wine-glass stem. That’s perfect!
2. Lowe’s DIY Bath Caddy
Bath caddies (sometimes called bath trays) are an intense DIY project. You need handyman skills and possibly power tools. This DIY bath tray is made with parts from Lowes. It’s built of a single plank of wood that’s 8 feet long, 8 inches wide, and an inch thick. To seal the wood, coat the caddy with polyurethane for waterproofing and wood stain for aesthetics.
3. Sarah’s DIY Bath Caddy
Cut-outs are the easiest way to make cup holders and tea lights. But they’re not your only option. This DIY bath caddy takes the tray approach, with a thin flat bottom and raised sides to hold your bath items. The edges are black to contrast the nude plywood base. For added aesthetics and functionality, the tray is fitted with firm brass handles. Don’t forget to seal!
4. Warren’s Pallet DIY Bath Caddy
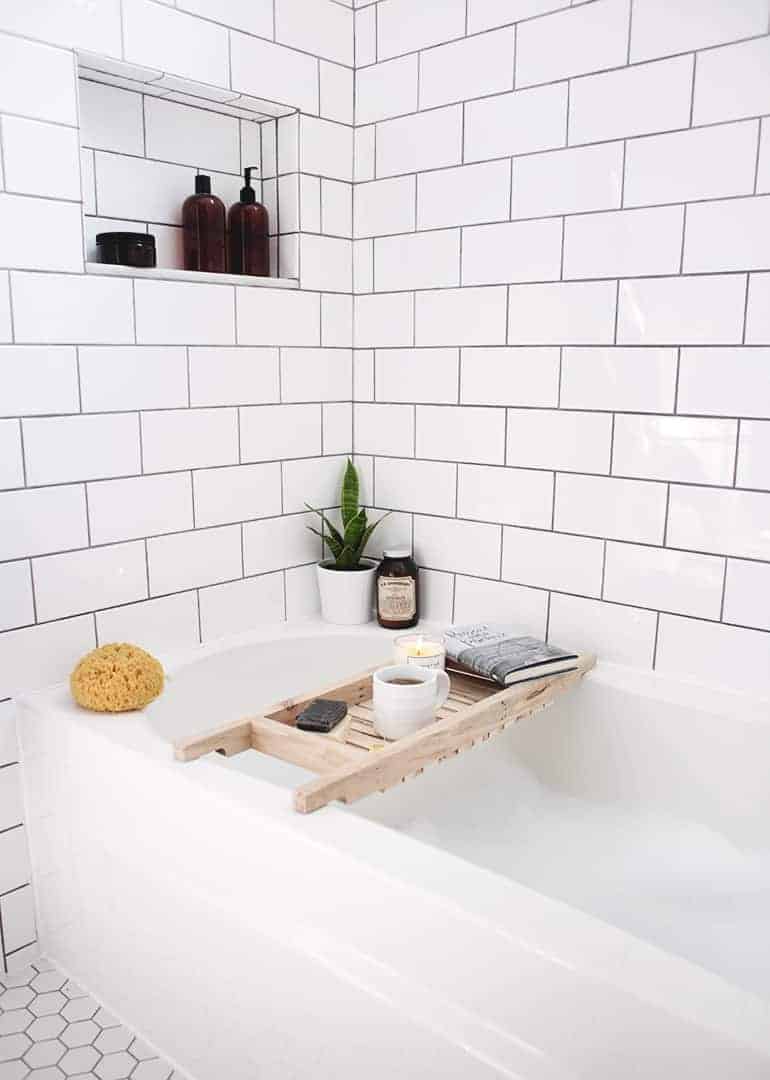
Pallets and shipping crates are convenient raw materials for DIY projects. You can get them cheap at lumberyards or produce stores that get daily deliveries. This project uses half a tray. Be careful with these pallet bath trays though, because the gaps between the slats let steam and moisture through. This could soak your book or wet your tablet/laptop in the bath.
5. Clear Lucite DIY Bath Caddy
You have to be pretty brave to risk bringing your expensive laptop into the bathtub. And unless your tablet or e-reader is waterproof that’s an even bigger gamble. So using a glass or plastic base for your bath tray is a great way to get around this. Use PVC window molding and screwed-on handles. Both are easily found at the hardware store, and they can cut it too.
6. Handyverse Pallet-Board DIY Bath Caddy
You can sometimes get pallets for free at junk piles or shipping yards. The pallets used here are reclaimed, which cuts your cost. For the screws, use a countersink. It makes the screws sit flush against the wood which reduces splinters, scratches, and rust. This version uses a cut-out for the base of your wine glass (rather than the stem) so cups can also fit in the slot.
7. Overhanging DIY Bath Caddy
When you’re building a DIY bath caddy, it needs to slightly overlap the lip of your bath. This keeps it from slipping into the tub when your body shifts or your legs move. The L-shaped DIY option here makes the overlap secure by making it ‘fold’ over the outside of the bath. The tray also has raised borders and a groove to hold your iPad so it feels firm and sturdy.
8. Cottage Life DIY Bath Caddy
Here are five essential tips for constructing a DIY bath caddy. One, seal the wood to reduce moisture damage. Two, sand the holes. Three, use both wood and screws to attach the pieces. Four, sand all the holes, cut-outs, and edges. Five, pre-drill and countersink any screws or nails to avoid snagging your skin, towel, or fabric. You could add a glossy top coat if you like.
9. Vintage DIY Bath Caddy
Stroll through the local junkyard and you’re sure to find old retro cupboards. You don’t need the whole thing – just a door with one or two handles. And a broken door is probably easier to find than an entire intact cabinet. The cupboard handle works as a tray handle. Add a second matching one if needed. Sand the wood and seal it for a sweet and simple bath tray.
10. Mixed-Wood DIY Bath Caddy
You can design an impressive DIY bath caddy from bits of wood scrap lying around the yard. You could even carve a driftwood log and cut wine-holders into it. But when you want a more involved project, mix walnut and holly for a pretty two-tone bath tray. Coat the wood with several layers of Waterlox or a similar polyurethane sealant. This keeps out steam and water.
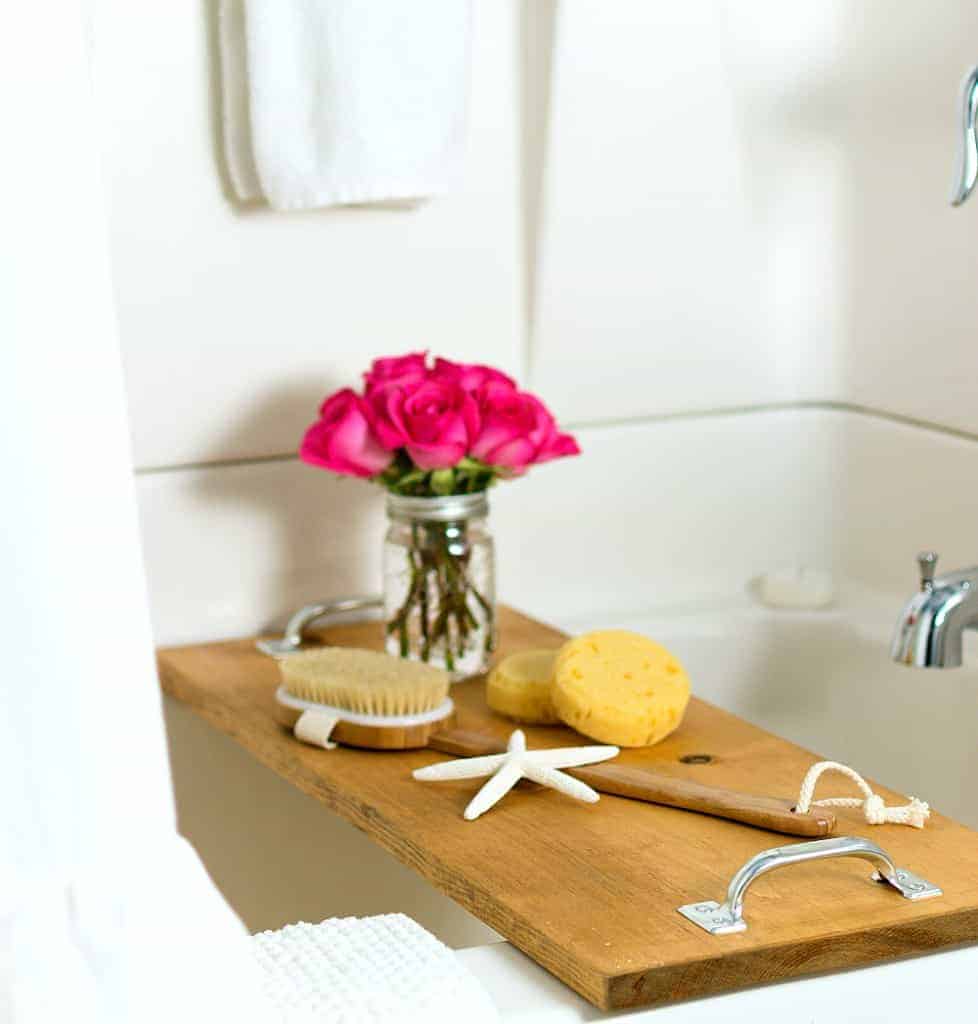
11. Rustic DIY Bathtub Tray
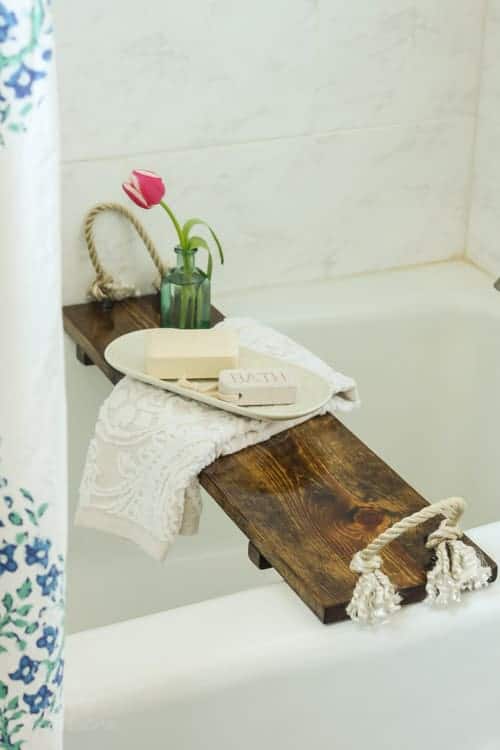
Here’s another idea for broken cupboard panels. You want one with rustic details like keyhole hooks or doorknobs. You could also buy utility handles or decorative screws with rings up top. Loop strong cotton rope through these keyholes. The rope will serve as DIY bath caddy handles. Seal the wood and add 1-inch strips below to stop the tray from sliding.
12. Nick’s DIY Bath Table
Bath caddies typically have slots for tea candles, cocktail glasses, books or tablets, and sometimes bath products. But this one has a shallow slow for your phone as well, so it’s a handy addition. As always, thoroughly sand any edges or cut-outs to remove potential splinters. DIY bath trays are sealed rather than painted because the paint can pucker.
13. Farmhouse DIY Bath Caddy
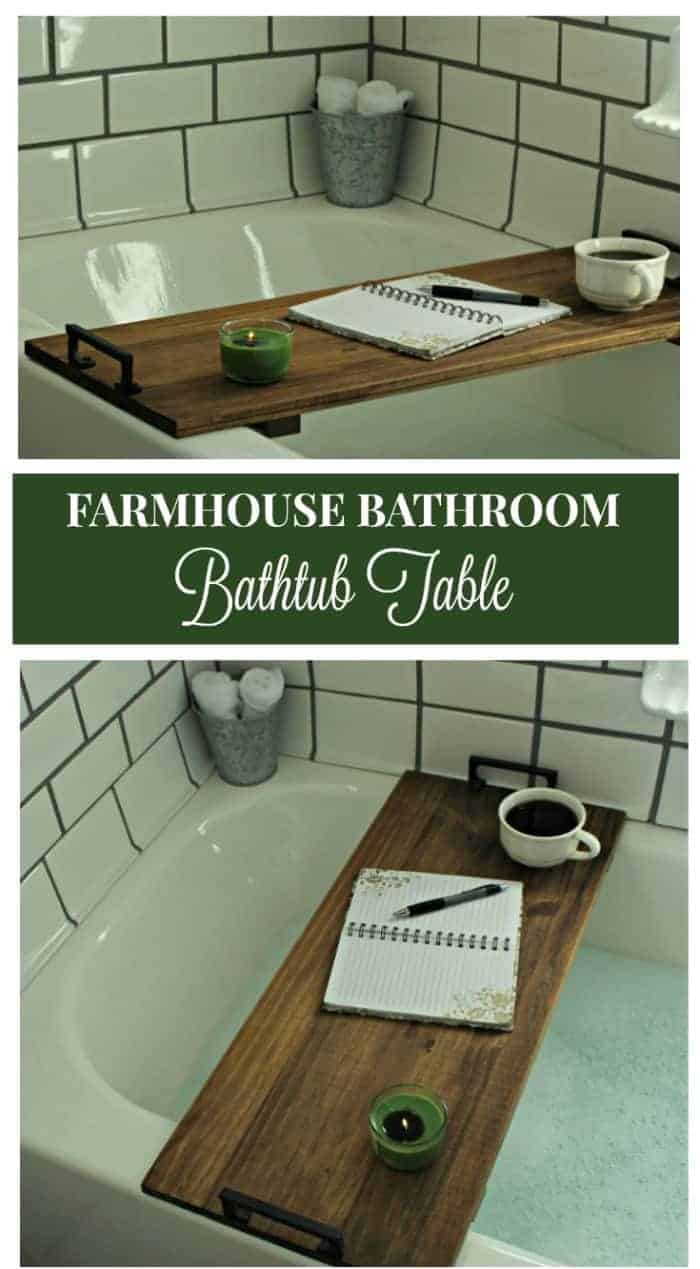
If you’ve watched old ranching movies, you know people often bathed in troughs. These might be oil barrels sawn in half or repurposed animal watering troughs. So you want your DIY farmhouse bath tray to have the same character. Use a dark stain or distressed wood salvaged from the junkyard. Use vintage black brass handles and seal with Gator Hide.
14. April’s Walnut DIY Bath Caddy
In a pinch, a sizeable scrap of sealed plywood makes a great bath caddy. But when you want something fancy, you can try two-tone beech + walnut strips with slots for your phone, tablet, and wine glass. The bottom is slatted for aesthetics and functionality, but be wary of steam getting through these slats and wetting your electronics. Seal the wood with Miniwax.
15. Spa-Style DIY Bath Caddy
Nude, slatted bath caddies are popular at high-end spas, so try this one at home. It has a minimalist feel. Instead of crossbars on the underside, this DIY bath caddy has customized curves cut into the sides. They match the shape of your bathtub’s edge. The tray doesn’t have cut-outs for cups and candles, but the sides are raised so you can use the flat midsection.
16. Sawdust & Wanderlust DIY Bath Caddy
This stylish DIY bath caddy has decorative etching at the corners. You can carve or color any pattern you like, whether it’s an abstract or your kids’ doodles. The bath tray has shallow slots for candles and bottles, but be sure they’re deep enough to avoid toppling. Use an L-shaped groove for your wine stem or cocktail glass. If you’re adding color, use acrylic paint.
17. Simplest DIY Bath Tray
When you really can’t be bothered with the fuss, try this two-slot DIY bath caddy. It’s basically a wooden plank with two notches for wine stems and tea lights. The main work is sanding and sealing the wood. Spray-can sealants are the easiest, but be sure to use multiple coats, waiting for each coat to dry before adding another. This avoids creating ‘bald spots’.
18. Casual DIY Bath Board
This DIY bath caddy looks deceptively simple. It has a wine stem slot, cut-outs for a wine bottle and tea light, and a central groove for your eReader. The edges and slots have stepped decorative bevels – that could end up being the most time-consuming section of the project because it needs careful cutting and intricate sanding. The rubber feet are a nice touch too.
19. Distressed DIY Bath Board
The best wood for bathroom use is cedar because it can hold its own against indoor humidity. But any wood will do, as long as you seal it thoroughly. You could also use salvaged wood and whitewash it to give that peeling-paint-flecks effect. For this version, the wine holder is a hole that goes right through the board with a removable book holder plank.
20. Hidden Homestead DIY Bath Caddy
The main parts of this DIY bath caddy are standard – a wine stem slot, a book groove, and tea light cut-outs. But because this is a special gift, you can put extra effort into the handles. They’re heat-forged and hammered into a decorative coil with leafy detail. Use a rust-proof but malleable metal for these handles. Or powder-coat them so they’re safe in bath steam.
21. Low-Key DIY Bath Caddy
Let’s go from a DIY bath caddy built in a professional workshop to one assembled at a crafting table. Yes, that’s a hot glue gun, but you’re better off using wood glue or waterproof glue. Also, when you’re gluing planks together, it’s useful to reinforce he glue with screws. You can place the screws diagonal for better hold. And paint a waterproof sealant all over it.
22. Blue & Grey DIY Bath Tray
You can make a DIY bath caddy from any piece of wood. This version uses reclaimed planks. Remove any stray or rusty nails and sand them smooth to avoid contamination. If the planks are too narrow, you can glue and/or nail multiple pieces together, but do it carefully to keep the wood watertight. A mitered border can also help in keeping the wooden planks together.
23. Hunker’s DIY Bath Caddy
The kind of wood you use can elevate the elegance of your bath tray. The lumber used here has gorgeous grain patterns that make this simple bath caddy look extremely sophisticated. So even if you’re using driftwood or scraps, pick wood that has a pretty natural pattern, choose a stain to retain that organic design. Always waterproof your wood (e.g. Polycrylic).
24. DIY Stained Bath Caddy
Making a DIY bath caddy can be easy. But you can waste a lot of supplies. So before you cut, nail, or glue anything, draft a design plan. You can use sketching software or just draw it in a notebook. Double-check all measurements, and if you’re using power tools, wear safety gear (earmuffs, gloves). If you don’t like wooden legs on the tray, use 3M stick-on rubber feet.
25. DIY Pinewood Bath Caddy
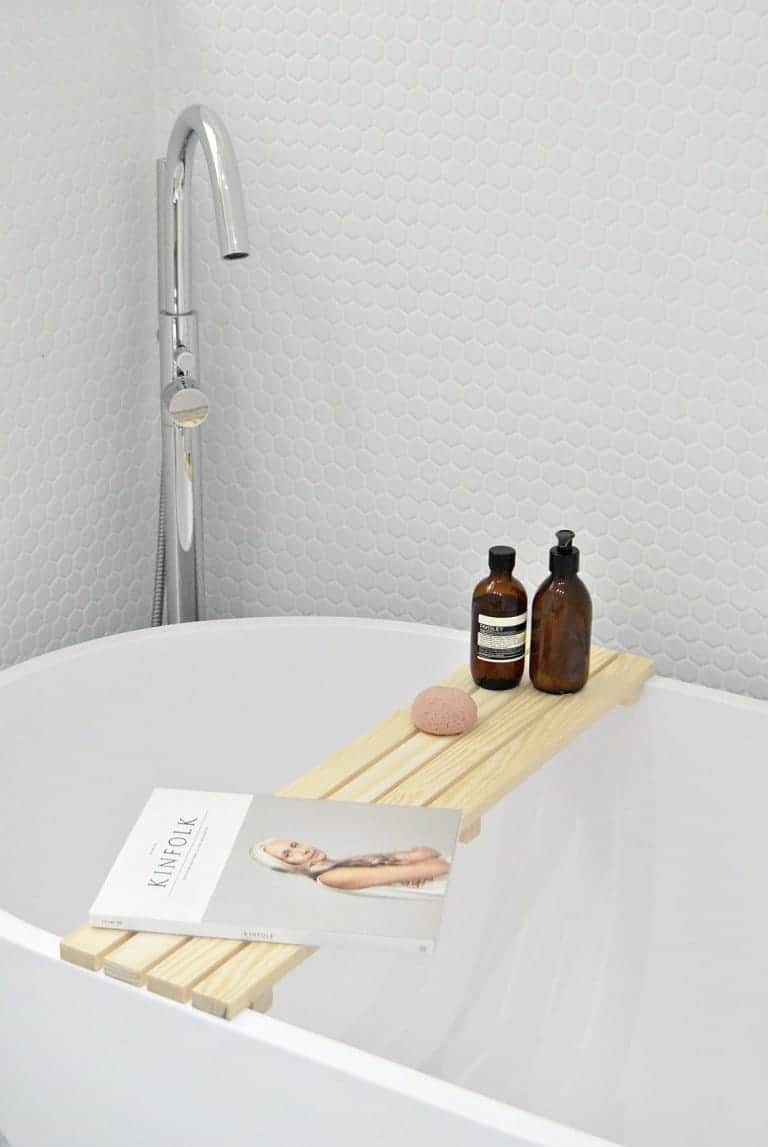
Pinewood has a pretty color, so even without a visible finish, it can be a stylish addition to your bathroom. And this DIY bath caddy is low-fuss and low-effort. Just take four narrow planks of pine. Space them into slats and use three crossbars to nail them together. These crossbars double as bath tray legs. Add stick-on rubber feet at the edges for tub traction.
26. Bunning Bath Tray (DIY)
You can buy utility handles at many hardware stores. And they come in a variety of styles. This bath caddy uses boxy metal handles that resemble cast iron – but pick a rustproof metal for your DIY bath tray. Fasten the handles to a wide wooden plank, attach two legs at the bottom, then seal the whole thing using a waterproof polyurethane coating (or three).
27. Top Bar DIY Bath Tray
If you’re buying wood specifically for your bath tray, you can pick a broad piece. But if you’re reclaiming or salvaging lumber, your strips will only be one or two inches wide. Crossbars can help hold the strips together, and these bars are often mounted below the tray to serve as legs. But for this design, the crossbars go on top and have shiny utility handles over them.
28. Pre-cut DIY Bath Caddy
https://www.youtube.com/watch?v=pRUmAXhVbKE
DIY lovers have levels. Some have an entire workshop kitted in their garden sheds. They have routers and drills and miter saws and everything! And some have a hammer, a handsaw, and a glue gun. So if your handy skills are on the lower side, pick a design, confirm the measurements, and ask the lumberyard to pre-cut your planks. Then just screw them in!
29. Blue DIY Bath Tray
You may have noticed the DIY bath caddies on this list aren’t colored. It’s because paint can easily peel or chip from regular exposure to steam. But yes, you can buy waterproof paint and that works. Look for designated exterior paint. Or maybe the kind used on outdoor furniture. Your hardware store attendant can help you buy the right type and brand for your bath tray.
30. Kelly’s Affordable DIY Bath Caddy
If you already have (power) tools and timber strips, you can build a bath board for less than $10. The cost covers adhesives (nails, screws, glues, stick-on rubber feet, etc.) Select your wood for visual appeal – knots can be quite attractive. But don’t attach legs or screws to the knotty spots because those spots are weaker so you could damage the wood before you finish.
31. Sweethearts DIY Bath Tray
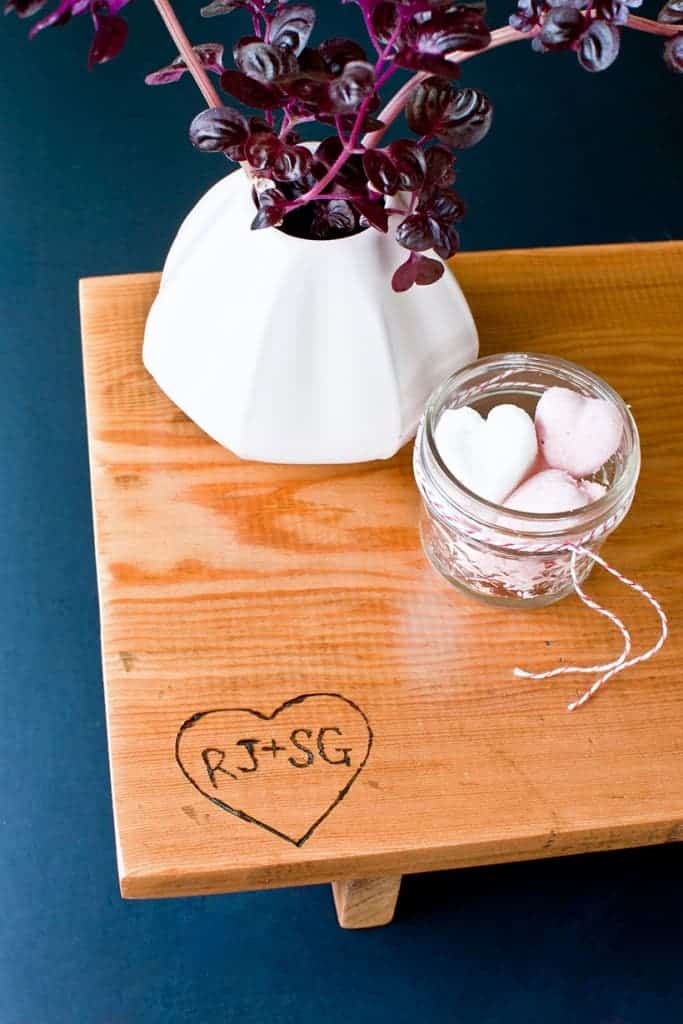
We’re at the end of our list. And you’ll have noticed the simplest form of DIY bath caddy involves a wooden plank, two legs beneath the tray, and done. So if you want to personalize the bath caddy, consider the tried-and-tested sweetheart scratch. You’ve done it on trees, rocks, concrete slabs, and school desks. So carve your love at the corner of this tray too!
What’s your favorite DIY bath caddy? Show us how you make it in the comments!