A good shower curb keeps water contained in the shower area preventing you from soaking the bathroom floor. A great and well-made shower curb does all that and is fully waterproof. This means it doesn’t take in water through leaks, allowing it to last longer
As you might expect, different people use different methods to build shower curbs. Some of these methods work fine but in this guide, I’ll be focusing on durability.
I will show you everything it takes to build a shower curb that can last decades without damage from water. Along the way, I’ll mention other methods and why I prefer to build it in a particular way. Here are the 6 steps to build a shower curb:
Step 1: Form the Shower Curb
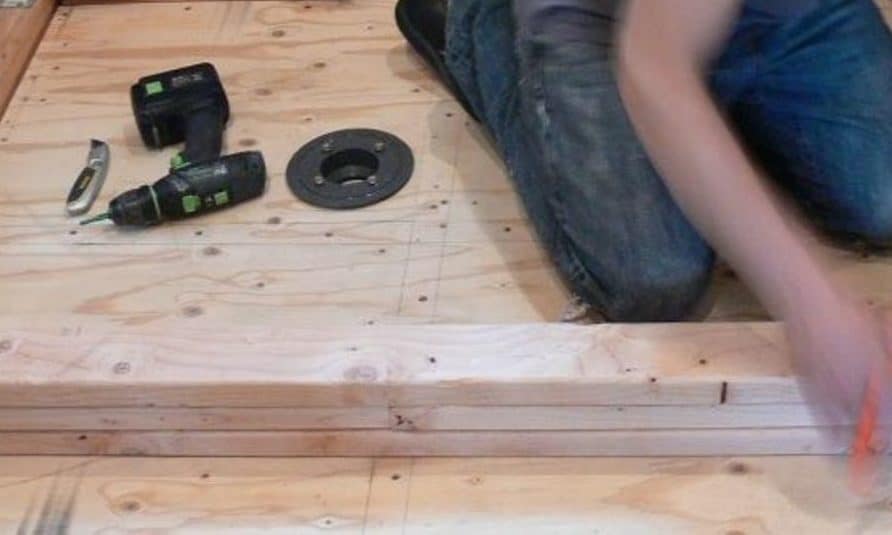
The type of floor you’re working on determines the material you need for your curb. If you’re working on a wooden floor, I recommend stacking about two or three 2 x 4 wood on each other to create your curb.
They are commonly used and you can find them at any Home Depot near you. Simply cut the length of your shower entrance and screw them to the floor on top of each other.
It’s just as easy with a concrete floor, stack about two or three concrete bricks in your desired shape. You can attach them to the floor and together with regular thinset. Check to ensure that the height of your curb does not tamper with your shower door.
Pro tips:
- Don’t use lumber on a concrete floor as it will eventually absorb water and swell.
- Be mindful of the height of the curb; too high and children (even adults) might trip.
- I don’t recommend treated wood because it contains a lot of moisture and it might shrink later on. Remember the goal is a durable shower curb.
- Use non-corrosive screws if you can.
Step 2: Lay the Liner
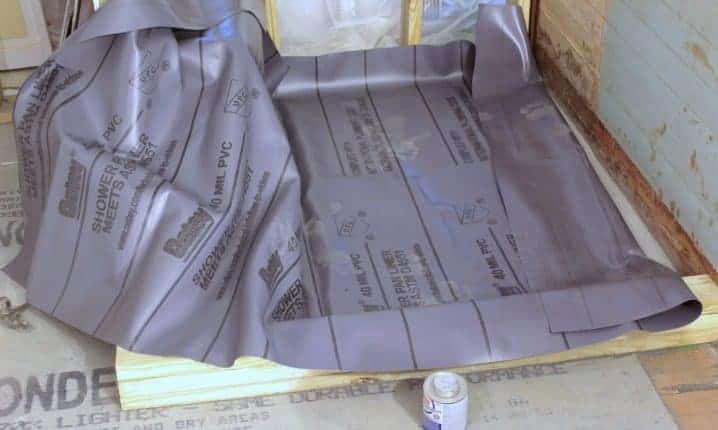
You’ll need a flexible and waterproof pan liner to protect your wooden curb from any contact with water. If you have already pre-sloped your shower floor, you can proceed to lay the liner.
Spread the liner on your bathroom floor in such a way that it runs up the walls inside your bathroom evenly. It should run about seven or eight inches high and it will be eventually covered by the wall panels.
The liner should cover the curb entirely and it should extend onto the bathroom floor. Take special care not to perforate the liner to prevent future leaks.
Remove the top half of the drain flange that bolts onto the lower part and replace the bolts before laying the liner.
Pro tips:
- Take appropriate measurements before buying your liner. Buy a little extra to be safe.
- If your liner is too sturdy to lay, try exposing it to some heat. Sunlight alone can make it easier to work with.
Step 3: Cut out the Drain Hole
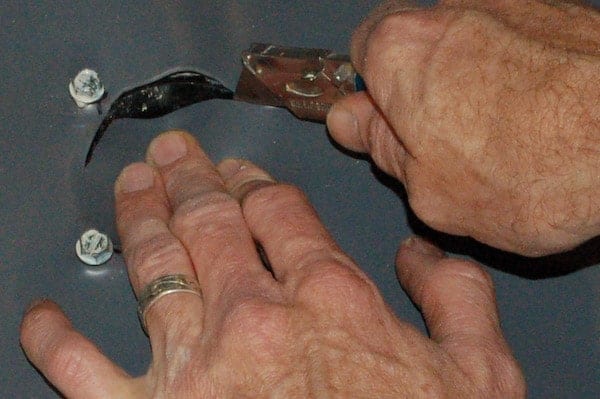
Cuts made to the shower liner are irreversible and if you make the wrong cut, you will need to buy a new liner to ensure the waterproof integrity. That said, to make cuts you’ll need steady hands and a sharp utility knife for precision.
Feel for your shower drain and poke a hole right in the center with your knife. In a spiral motion, cut out the liner till the circular hole reaches the four bolts of the bottom part of the drain flange.
Unscrew the four bolts from the drain. You will need to waterproof your drain to prevent water from seeping under your liner. To do this, simply add a ring of silicone under your liner and onto the bottom part of the flange. Don’t pour any silicone into the bolt holes.
Using your gloved hands, press the pan liner onto the silicone ring till it makes full contact. Place the top part of the drain flange onto the liner and screw it in gently.
Pro Tip:
- Drain flanges are made of plastic so don’t screw them too tight or they might crack.
Step 4: Set the Liner
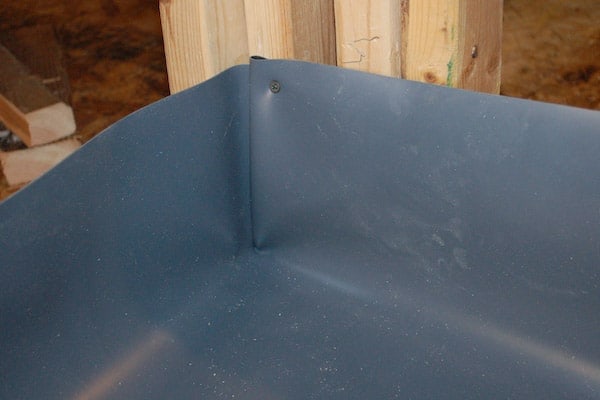
Set your liner into the corners of the shower floor and curb. Raise the edges up against the wall and hold them in place with some tape. You can also nail the liner up instead of taping it.
However, ensure that your nail is as close to the edge of the liner as possible.At the two (or more) corners opposite the curb, fold the liner onto itself; do no cut.
At the edges of the curb, cut the liner vertically where the curb meets the wall. Lay the liner flap over the curb but ensure that it covers it completely.
If it doesn’t, water might leak into your curb through the corners. To further prevent leakage where the wall meets the curb, use pan glue to hold the liner in place on the wall.
I also use special corner wraps (dam corners) to cover the inside corners perfectly especially where the vertical cut is not perfect. They are pre-formed into corner shapes so I simply glue them onto the liner.
However, you only get one try to glue them right because the glue sticks fast, so glue them carefully.
Pro Tips:
- Use the appropriate liner glue for the liners, other glue types will not work.
- Use a 2 x 4 to push the liner up against the curb on the inside and outside to avoid air pockets.
- Use screws to hold the liner in place on the outside of the curb. Do not puncture the liner on the inside or on the top.
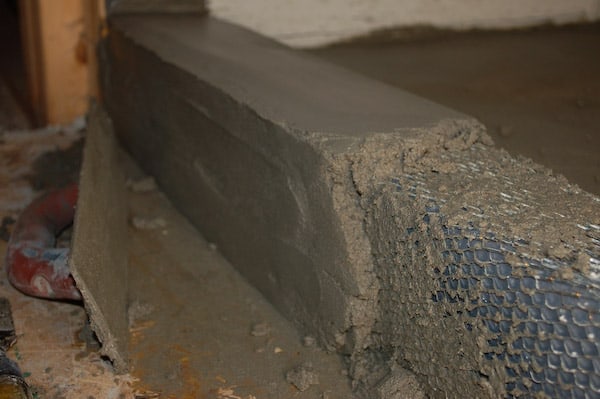
Step 5: Cover with Lath
Some people prefer to nail planks of wood around the curb on the inside, top and outside and then cover nails and spaces up with RedGuard.
Personally, I do not believe in puncturing the liner for any reason, that method works fine, but mine gives me ultimate assurance of zero leakages over a long period of time.
We will be covering the curb with metal lath so we can add a layer of cement mortar (mud) to cover it up nicely. Cut out the length of lath you need to cover the curb minus one inch.
The reason you’re cutting one inch less is so the lath is not too tight against the liner and pierce it. You can get lath Amazon or at a supply store near you.
Drape the lath over the curb and bend it into shape. If you used a 2 x 4 for your curb, a neat trick to get the perfect bend is to place a 2 x 4 inside your lath and bend it around the lath.
You can keep the lath in place by nailing it down on the outside of the curb. If you have a concrete curb, you need not nail the lath it should stay in place.
Pro Tips:
- Cover the edges of the lath with tape to prevent it from piercing the liner.
- Wear gloves, lath’s edges can cut you.
- You can overlap up to three pieces of lath over each other to make it stiffer.
Step 6: Mud It Up
Next, you’ll apply mortar around the lath to provide a base onto which you can apply the finish material.
You can buy pre-made mortar form stores, add some water and you’re good to go. Alternatively, you can mix your own mortar. To create your own mortar:
- Mix 4 parts sand, 1 part Portland cement, and 1 part masonry lime together.
- Add some water.
- Mix thoroughly until it is creamy instead of runny like normal concrete.
- Leave it to rest for six to 10 minutes before remixing it.
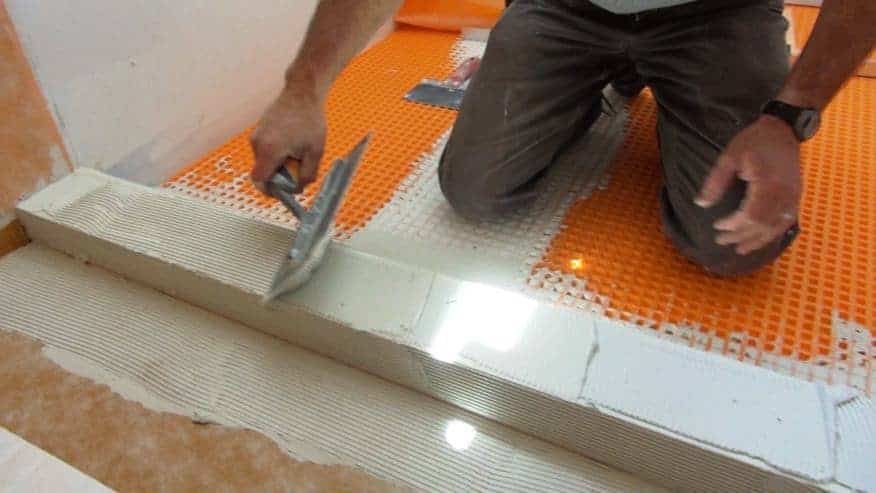
Spread some mortar on the curb, about one inch high should do. Place a straightedge on it and press downwards to create suction.
Apply at least ¾ in. thick mortar to the outside of the curb while the straight edge is on the curb. Use the straightedge to keep your measurement constant.
Gently push the mortar in to keep it in place while you apply it. Remove any excess mud with your flat trowel.
Take care not to pull off the mortar when removing the flat trowel. After scraping the outside, move the straight edge to the other side and apply the same thickness of mortar. When the inside mudding is done, take a break and leave the mortar for about an hour to harden.
When you return from your break, grab your flat trowel and use it to fine tune your work. Gently slide the straightedge off the top of the curb.
Fine tune the top of the curb to whatever height matches your shower door, if there is one. You can also tilt the top a little towards the shower area so water can trickle back in. This will require additional dexterity but you can achieve it your flat trowel.
Make sure the outside and inside of the curb are parallel to each other, you can use the level to make sure all your angles are correct. Tile the sides first and then the top of the curb after about 30 minutes.
Pro Tips:
- Powdered lime can burn you, handle it with care.
- Add some water to your flat trowel and straightedge so the mud doesn’t stick to it.
Conclusion
Building a shower curb the right way is not as hard as you might think. If you follow this guide, you should not have any major difficulties especially if you’re using the right tools.
Leave me a comment below if I was helpful or you have any questions you want to ask me.